|
1. Create a new image. 
I used 200x200 pixels, 72 dpi and a background colour of white.
|
|
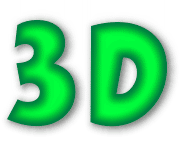
2. Create a new text object and centre it to the image..
Choose a wide font. I used the letters '3D', in Boink LET font , 150 pt with a moderately dark colour (you will need to choose a related lighter colour later). Other useful fonts you could use for this type of effect are: Impact, Alexuss Heavy, Arial Black, Futura XBlk BT and others.
Centre the object to the image. (Object > Arrange > Align and Distribute or use the  icon). icon).
|
 |
|
3. Create a mask from the text object.
If necessary, check that your current mask mode is either normal  or additive or additive  ( Mask > Mode or select any mask tool and inspect the Property bar). ( Mask > Mode or select any mask tool and inspect the Property bar).
Make sure the text object is selected (you may need to reselect the Object Picker tool  if you changed the tool to a mask tool to check your mask mode) then create a mask from the object using either Mask > Create From Objects, CTRL+M, or if you changed the tool to a mask tool to check your mask mode) then create a mask from the object using either Mask > Create From Objects, CTRL+M, or  on the Mask/Object Toolbar. If you have the Mask Marquee Visible Toggle turned on you will see the 'marching ants' mask marquee around the text object. on the Mask/Object Toolbar. If you have the Mask Marquee Visible Toggle turned on you will see the 'marching ants' mask marquee around the text object.
|
 |
|
4. Feather the mask.
From the menu, choose Mask > Shape > Feather. Choose a width of 12-15 pixels, Direction = Inside, and Edges = curved. In Photo-Paint versions 9 and 10 the Mask Overlay will automatically be displayed in your image so you can visualise the mask feathering accurately. The tiny 'eye' icon near the lower left of this dialogue toggles the live preview mode on and off.
Click OK to apply the mask feather command.
|
 |
|
5. Switch to Paint On Mask (POM) mode.
Either use Mask > Paint On Mask, CTRL+K, or the  icon on the Mask/Object Toolbar. icon on the Mask/Object Toolbar.
The image now switches to a grayscale representation of the mask you made and feathered just above. For an introduction into POM, please see the TIP box below.
|
 |
|
6. Blur and smooth the mask in POM mode.
Apply a Gaussian Blur with a radius of 3.0 pixels ( Effects > Blur > Gaussian Blur ).
The POM object loses its 'tattered'
look at the edges.
|
 |
|
7. Switch off POM, then fill with a lighter related colour.
Use either Mask > Paint on Mask, CTRL+K or use the icon to toggle the POM mode off.
Right-click a lighter, related colour on the Colour Palette to change the Fill colour, then use Edit > Fill, then click OK to fill the masked area of the text object with the new colour.
Remove the mask ( Mask > Remove, SHIFT+CTRL+R, or  ) )
|
 |
|
8. Add a light drop shadow for effect.
Select the Drop Shadow tool  from the Tool Box, click near the centre of your object then drag to create a drop shadow. from the Tool Box, click near the centre of your object then drag to create a drop shadow.
Adjust the Drop Shadow Property Bar settings to suit.
(Try Feather Direction = middle, Direction = 320, Offset = 4, Opacity = 60, feather = 20 to achieve a similar result to that shown here.)
|
 |
|
TIP: A word about Blur Types.
The effect here can be achieved in slightly different ways by using different types of Blur effects, which alter the POM image slightly. Try replacing the Gaussian blur step with other blur types and note the difference. In some cases the effect is not significantly different but in others, the blur may be affect outer and inner edges differently or may created a smoother or wider/narrower effect. Here are some examples. Can you spot the difference?

The effect of using different types of blurring on the mask in POM mode.
|
|
| |