Step 2: Adding a Undo History List icon (and others) to your Toolbar.
Click Tools/Options on the menu bar again to reopen the Options dialog.
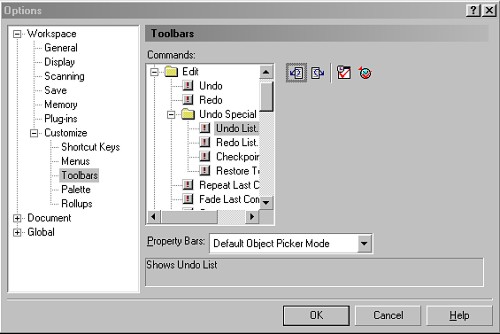
Click the + sign next to Customize (in the Workspace tree) in the left hand pane and then select Toolbars (click the + sign next to Workspace to open the tree structure if you cannot see the Customize branch). A list of Commands now appears in the right hand pane of the dialog box.
Click the + sign beside Edit and then the + sign beside Undo Special in the
right hand pane. Select Undo Special and the displayed icons change
to another set. (Figure 2.). If you click one of these a description
appears in the dialog box status bar, while resting the mouse
cursor over an icon displays a short help pop up The left most
icon is the Undo List icon (Undo History List).
Figure 2. Adding the Undo List icon to the Toolbar
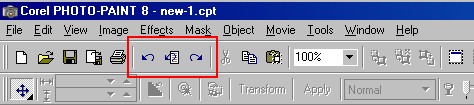
Click on the icon in the dialog box and drag it up and onto the Toolbar (the top one, the lower one is the Property bar) and then release it in a suitable position. While we are at it we might as well add in the icons for the standard Undo and Redo buttons (located just above Undo Special in the dialog box) to make a complete undo-redo section in the Toolbar. Don't move the Redo List up there just yet; we want to do something rather special with it later on in this tutorial. Figure 3 shows how I have arranged my 3 new buttons and added in 2 new separator bars (see if you can find out how to add these!). If you place the icons in the wrong place simply drag them to a new location while in this Toolbar Edit" type mode.
Click OK on the dialog box when you are satisfied.
Figure 3. Adding the icons and separators to the Toolbar.