A tutorial for Corel Photo-Paint versions 8, 9 and 10
|
||
| Creating text cutouts in Corel Photo-Paint. A tutorial for Corel Photo-Paint versions 8, 9 and 10 |
| Overview of a Cutout | Basic Method (advanced) | Basic Method (beginners) Example and Hints | Advanced Examples |
||
|
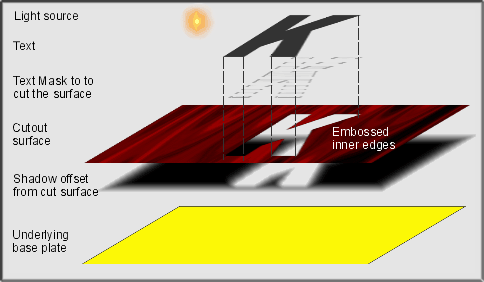
A cut-out is a shape cut into a large, usually flat surface. Cut-outs look terrific and are the basis for much of the modern plastic and metal signage work that you see in many places today. There are a number of different methods for creating cut-outs but the method described here is simple and effective, and is easy to learn and remember.
|
||
| top | ||
|
Overview of a Cutout: |
||
|
||
|
The basic method to create a cutout is fairly straight forward. But as the experience of Photo-Paint users varies widely, I have provided a brief method for experienced users and a more complete, step-by-step explanation for less experienced users. If you choose to follow the latter instructions, please return later to brief instructions and see if you can follow it that way also. It will help you remember it better with fewer words in the way. |
||
|
Basic cutout method (experienced users):
|
||
|
||
|
|
||
| Basic cutout method (beginners): | ||
|
1. Create a new 24-bit image in Photo-Paint at 400 x 300 pixels, 72 dpi with a white background: |
||
(CTRL-F7 or Window > Dockers > Objects). Click the New Object icon at the bottom of this Docker (right) to create a new Object (or use Object > Create > New Object). The Docker displays a new object called Object 1. |
||
Double-clicking on the Fill icon on the Status Bar and then selecting the Texture Fill icon (right). Choose something you like then press OK twice to return to your image. |
||
| 4. Fill the object. Select the Bucket (Fill) Tool from the Toolbox and click near the middle of your image to fill Object 1 with your chosen Fill. |
||
| 5. Set up the text properties. |
||
| 6. Create the text. Click near the centre of your image and type a single large letter. If necessary, move the cursor to the boundary of your letter (the cursor will change to 4 arrows) and reposition your text until it is centred. Don't be too fussy, near enough is good enough here. |
||
| 7. Render the text. |
||
| 8. Check the Object Docker and make sure that Object 1 is still selected. |
||
|
9. Create the cut-out. That's it, you've now made your basic cut-out. Yes, it has gone to the clipboard but that doesn't matter - just leave it there we won't be needing it. |
||
|
10. Create the shadow. Select the Drop Shadow Tool an click near the centre of Object 1 and drag it down and to the right. You can adjust the settings on the Property Bar:
Render the drop shadow by clicking Apply, OK or choose the Object Picker tool (instant apply in version 10) depending on which version of Photo-Paint you are using. Now you have a shadow through the cutout and it is starting to look at little 3D. |
||
|
11. Emboss. This must be done so that the lighting effect looks realistic. The embossing angle must be the opposite to the drop shadow you created. The Emboss tool does NOT need a mask like the Boss and Glass Effects do. Open the Emboss dialogue box ( Effects > 3D Effects > Emboss ). Click the Reset button then choose ‘Original Color' and change the angle to 135 degrees. Click OK. |
||
|
That's it! - Your cutout is now complete Once you get used to it just follow the steps in the experienced users section and you will see just how easy it really is. |
||
| top |
|
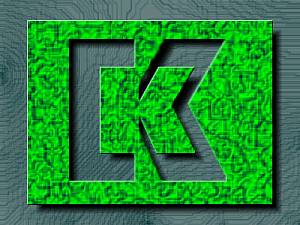
Example and Hints Figure 3 was created by:
|
|
Helpful hints:
Here are some extra hints which may be helpful when creating cutouts:
Why not try out the following:
Advanced Examples:
Here are some more examples and brief descriptions on how to create them:
|
Fig 4 - Fire wall. Fairly straight forward cutout. Use the Image Sprayer to spray small flames on an additional layer just below the cutout plane. |
 |
 |
Fig 5 - Big V The background and Object 1 have the same fill. ‘V' is cut first, then shadow and emboss added. Then, another flattened ‘hub' shape is cut from Object 1. That's all. |
|
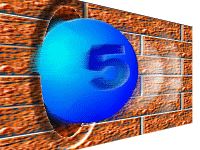
Fig 6 - Blue Ball. Sorry, this is a complicated image and would require too much explanation to fit here. See if you can work out how it was created. |
 |
- David Mutch 10/10/00
| More Photo-Paint Tuts | Contact Me |