
| Introduction Duotone - The Basics Duotone - Advanced Direct from RGB - HSL - Colour Balance - Selective Color - Color Hue & Tone Using Masks Conclusion |
|
|
|
From Grayscale to Duotone. Grayscale images do not contain any colour information - just 256 degrees of black to white. Therefore you cannot actually add colour to a grayscale image. The only way (I know of) is to convert it into a format which does use colour. To add only one, two, three or four colours it is best to convert the image into monotone (1 colour), duotone(two colours), tritone (three colours) or quadtone (four colours). |
|
|
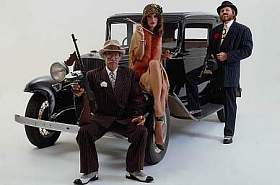
The photo I have selected
for this section is: If you are using PP8 the first thing you will need to do to this image is to convert it to grayscale as the conversion to Duotone is not available directly from RGB mode. - Image > Convert to > Grayscale (8 bit) (PP8) If you are using PP9 you can now convert directly from RGB to Duotone. Of course if you are using your own image and it is already in grayscale mode, this first conversion will be unnecessary. |
|
|
This image is a little dark when initially converted directly to grayscale. If we want it to look a bit old and faded then it needs to lighten up a bit. We can do this by adjusting the Gamma setting of the image. -
Image > Adjust > Gamma although anywhere between 1.8 and 2.4 would also be suitable, depending on the degree of fade you would like. |
|
|
Saving a Checkpoint Since we want to return to this stage of the image later, now is a good time to save a CHECKPOINT. -
Edit > Undo Special > Checkpoint (PP8) or Now you can retrieve the image at this point later on if you need to. |
|
|
Duotone Mode Basics The image can now be converted into mono, duo, tri or quadtone mode. All of these modes are available from the Duotone convert option. The Duotone dialogue box will probably come up with the Monotone setting listed in the Type list the first time. - Click the small arrow to the left of the Type dropdown list This allows you to select the remaining available modes. Select each one in turn and observe the changes in your image or preview window. - Click on the small eye icon (lower right) You now see the changes in your main image rather than in the preview panes. Do not click the OK button yet as there are more changes to make. If you do, just UNDO and then bring up the Duotone conversion dialog box again. |
|
|
Ink Curves OK, now that you know the basics of Duotone conversion lets fine tune our image. Each of the basic colours is an INK and each has an intensity range associated with a grayscale shade The graph on the right displays the dynamic ink curves. The horizontal plane displays the 256 possible shades of gray in a grayscale image (0 is white; 255 is black, similar to the additive CMYK scale, rather than the subtractive RGB scale). The vertical plane represents the intensity (or 'Tint') of an ink (from 1 to 100 per cent) that is applied to the corresponding grayscale values. To change the curve of a particular colour it must first be selected. - Make
sure you are in Duotone mode then The line on the graph will be yellow. - Click once in the centre of the graph and a small dot (node) will appear. When the cursor is over the node it changes to a hand and you can reposition the node by dragging on it. -
Drag the node downward to make a convex curve and note the change in your
image. The right side of the gradient will show more yellow while left side will show more black. -
Click on the Black colour swatch in the Duotone dialog box, |
|
|
You can add more than one node to each graph line. You can also move the end points -
Click on a different part of the curve and then drag it. If you find yourself in a complete mess, reset the line. - To reset a curve to linear, click the NULL button while the correct colour is selected.
Here is an example of one possible setting in Duotone mode and the resultant image.
|
 |
 |
 |
||||
| Copyright
©, 1999. David Mutch Ph.D. and Visionary Voyager Corporation. All rights reserved. |
||||||
 Gamma
Correction
Gamma
Correction  -
In PP8, use Image > Convert to > Duotone.
-
In PP8, use Image > Convert to > Duotone.
